Table Of Content
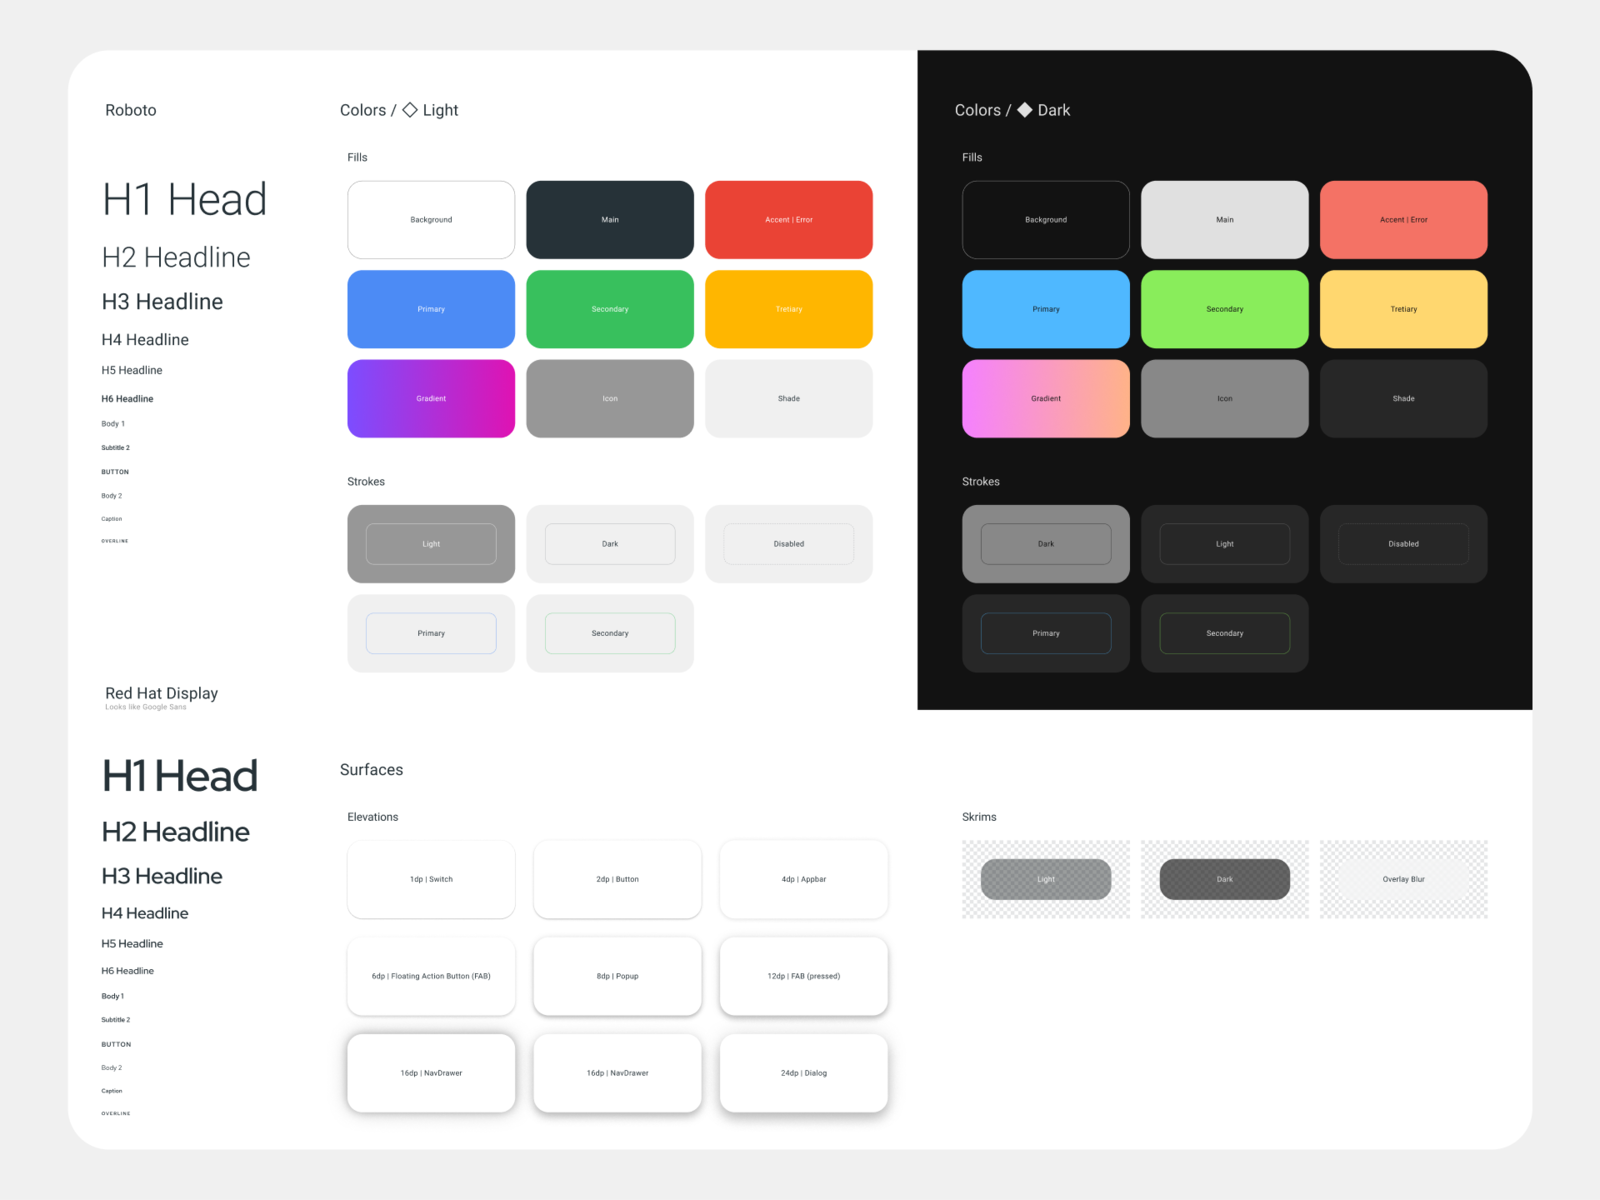
And you can see the subtle highlights here and the consistent shadowing applied in these product icons. As we'll be designing for light theme in our content, such as typography, and icons will be dark as opposed to light. And top left, you'll see that there are different variants of all these icons.
The Goldman Sachs Library
From the documentation we can see that Uber hasn’t published everything yet, but there’s still a lot to love. In particular, its black-and-white color scheme sets it apart from other design systems. However, a huge downside is that it doesn’t yet utilize Figma variables like other design systems. So you could create prototypes of this component in figma with this column layout, so I'm gonna wrap this in a frame, label this column, column one, cell column one, if you want. So the variant of this, I'm going to copy that text, paste it and with this cell, let's just set the constraints to center vertically and horizontally. So what we're going to go ahead and do is create a frame, label this elements space slash space, year selection, cell.
Create and collaborate with Figma
And since it's part of our library, we just use the assets panel and drag it in build the component, which is super convenient. If you can't find icons, you can either search and the material design icons tool for the icon. Go to our material design system, check out our icons, and we can look for them.

UI Prep
And with that mental model in mind, we'll be able to tackle building out these complex components. And this footer was already created, all I had to do was add a divider into this element. And I just specified the proper spacing between all the elements within this list item, then I just duplicated them. And then I wrapped that in a frame, I set the height, as you can see here, to 48.
WFP UI Kit Components↗
And one thing I can do is hold down Option V and H which will center this horizontally and vertically. And I can go ahead and paste this to my canvas, and click on each type and just screenshot all these and for all of you Mac users out there. And also we're going to be talking about, we got the different variants. So we can go ahead and double check that by just pulling this next to it.
And I'll organize this later with that favorite, they're going to make that a main component, publish. And just ensure that all of this is grouped properly, ensure that this spacing is correct. So what we're going to go ahead and do is add this into the parent layer. Now, I'm going to pause this video, and I challenge you to make these two components here, it's actually really easy. And then when we adjust the width, everything constraints accordingly, as if it were an app responsive layout. And generally, the height won't stretch, since we have those specs set perfectly or properly.
Master shortcut keys in Figma for UI/UX (part 2) - Medium
Master shortcut keys in Figma for UI/UX (part .
Posted: Sun, 14 Jan 2024 08:00:00 GMT [source]
Elastic UI
The Figmaster is purely and simply about practice, so you can start using acquired knowledge right away. Figmaster plugin is a workbook for Figma that contains a large set of exercises on how to build your modern design system from scratch. Not just a cute name, the Shiba Onboarding UI kit by Piqo Design is robust, well-made, and free through the Figma community.
mobileLIVE
So with that said, One thing to double check is the height on this button, the height has been modified. And I just specify the spacing on this, make sure it's set to 16, I should be good to go, all we had to really do is modify the color and add a stroke. This might be tricky with auto layout, because it's not allowing us to specify each edge on on this layout here. By 18, all I did was I held Option Shift, which will proportionately scale this down as I drag the handles downward, I can plop this into my layer and ensure that this is vertically aligned by holding down Option v. And it's still centered, and it gives me some room to add in the new icon. And now all I need to do is ensure that the padding horizontal padding is not set to 162, which it is, as you can see there.
The future of design systems is accessible

And now, I can go ahead and just restructure the spacing there, make sure those are all eight dips apart. So now if I go in and type in item one, it will maintain the proper spacing on the left and right. Whoops, I'm going to grab this divider, push it down one more pixel, and it's from, from the textbox.
And with this specified, I'm going to set the width to 560 dips, and with the width specified properly, I'm gonna set the height to 182 dips and uses a corner radius of four dips. So that is padding on the left and right of this dialog that is not applying to the list items. And I'll also challenge you to building out some variants as well, I have all the screenshots here specified of the barriers we'll be making. And since the constraints are set to center vertically, they will dynamically adjust properly.
It can include technical specs, design tokens, documentation, and best practices; it can also include core principles and processes to guide UX design decisions and product development. This series builds on our Introduction to design systems course, where we cover design systems basics. If you want to learn more about the nitty-gritty of building a design system in Figma, check out our step-by-step walkthrough and the video below. Check out this Community file from Figma Designer Advocate Luis Ouriach for recommendations on how to build out your design system for teams, projects, and files. When setting up your library, think about what structure will work best for your team.
And now that we have our main component variant, I'm going to go ahead and see what we'll tackle next, what should we tackle next? Well, we can go ahead and create this confirmation dialog with actions. And now we have the proper textile set, we need to specify the color style to medium emphasis.
I can even go in edit and add a description and discuss that this is used for small hands sets. And now I can go ahead and name this as as such, so now it's extra small, and it's the first breakpoint from zero to 359 dips. So we can start by, I can grab this screenshot, and we'll do a couple together. It's already built out for you from from the bare bones structure, and also a desktop example of that. And it's a great starting point meant to be modified to meet the specific needs of a product. So this temporary region only appears temporarily and does not affect the responsive grid.
And units, again, for iOS use points, which remember that and then, of course, pixel density on the web scales to the devices, screen resolution, but when you're designing for the web, replace dips with pixels. In material design is commonly pronounced as dips, which is the abbreviation dp here written as dp, and pronounces Dibs, they're flexible units that scale to have uniform dimensions on any screen. And once you have it opened up, you'll notice that it takes you to material designs documentation.
Your earlier audit will come in handy here; use your findings to help build the case for how a design system will support key business goals. There’s no right or wrong answer—it depends on your team's capabilities, bandwidth, and long-term goals. In this short video, Jesse Showalter chats with Dan Mall about why design systems matter and how to know if your organization really needs one. Use Figma’s variables REST API to create and manage variables in bulk—saving you time while scaling your design system. Mizko, also known as Michael Wong, brings a 14-year track record as a Founder, Educator, Investor, and Designer. His career evolved from lead designer to freelancer, and ultimately to the owner of a successful agency, generating over $10M in revenue from Product (UX/UI) Design, Web Design, and No-code Development.


No comments:
Post a Comment